Hey there, tech enthusiasts! 📡 A lot of you might be using two routers at home. Even if your place isn’t that massive, a single router often can’t cover every nook and cranny with smooth internet. Ever felt the hassle of bouncing between networks or constantly switching to the nearest router? Well, worry no more! Let’s dive into how you can seamlessly set up two routers to create one unified network. 🌐
Let’s break down the network separation issue a bit more intuitively. You know how sometimes your network speaker (like a HomePod) appears and disappears, or your mobile struggles to connect wirelessly to the TV, or file sharing between laptops is hit or miss? Yep, that’s the separation blues. And don’t even get me started on the inconvenience of having to pick a specific router every time to access your file server (NAS). 😅
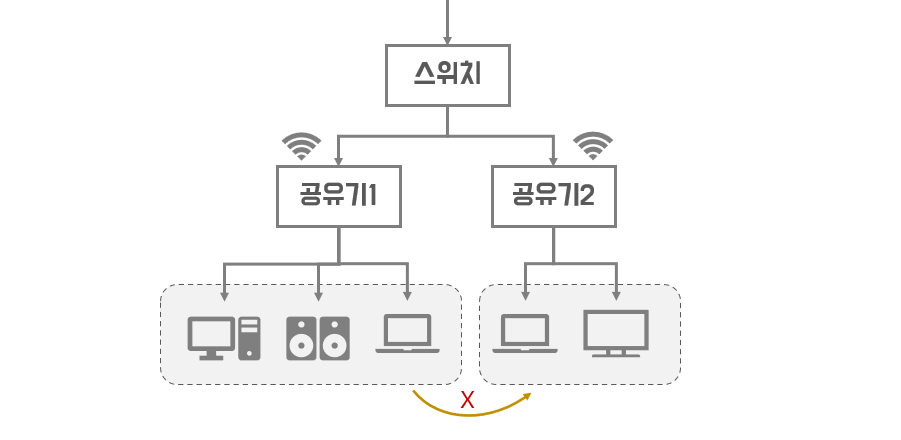
The root of the issue lies in both routers forming their own separate networks. The main aim of network separation is to keep areas inaccessible to each other. If you casually added a router to boost the Wi-Fi signal, it’s probably set up in one of the following ways. 🤔

Routers typically have two types of ports for ethernet cables: one WAN port and several LAN ports. You plug the internet service line into the WAN port, while the LAN ports connect to devices you want on the network. Simple enough, right?
Routers are set up to act as routers by default, meaning they bundle devices connected via LAN ports into a single network. In the second diagram, if you plug the internet line into the WAN port of Router 2, devices on Router 1 won’t connect to Router 2. That’s why the issues we talked about earlier crop up. The same goes for the first shared setup.
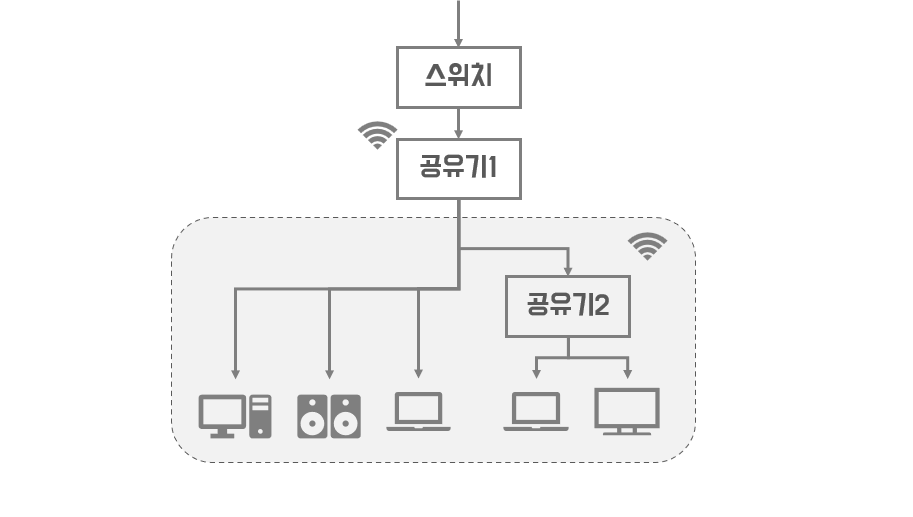
To create a single network, connect the second router under the first one as shown in the second example. Make sure to connect the ethernet cable to a LAN port, not the WAN port, on Router 2. Disable the DHCP setting on Router 2 to stop it from acting as a router. Set Router 2’s IP address to match the first three numbers of the network IP configured by Router 1, and choose a unique final number not used by other devices. Menus may vary by router, so a quick online search can help you navigate. 🌐🔍
Once you complete this step, your home will operate on a single network managed by Router 1. 🎉
Even with just these steps, file sharing and network speaker usage should be hassle-free. However, you’ll still be juggling two SSIDs (Wi-Fi names). To fix this, set Router 1 and Router 2 to the same SSID. If the 2.4 GHz and 5 GHz bands were set differently, ensure they’re aligned, so all four SSIDs match. 🌈
Lastly, make sure the 2.4 GHz and 5 GHz channels on both routers differ. If they’re the same, they interfere, slowing down the speed. Check the router menu to scan for channels used nearby and pick a unique one. If your router doesn’t offer this, try related mobile apps. 📱✨
Once you’ve done all this, you’ll notice that your devices automatically connect to the router with the best signal. Naturally, all devices will be connected within a single network. 🚀
Leave a Reply