This piece won’t walk you through every single step to grasp the concept. It’s more about understanding the idea here. Once you’re done, I’d suggest checking out other online posts for the nitty-gritty details.
So, you’re building an iOS app and wanna use Firebase Authentication for phone verification? Let’s dive in! 📱
Think about phone number verification like this: 1) The app sends the phone number to Firebase, 2) Firebase shoots a 6-digit PIN to that number, 3) User types that PIN back into the app, 4) The app sends the PIN to Firebase, and 5) Firebase checks if it’s the same PIN it sent. Sounds simple, right? But, Firebase needs to ensure the request is legit from the correct app, which means jumping through a few hoops. 🌀
Between steps 1 and 2, Firebase checks if the phone number verification request really came from the right app using Silent APNs notifications. When a number tries to log in for the first time, Firebase uses Silent Push Notification to send a token to the device. So yeah, setting up APNs is a must. 🔧
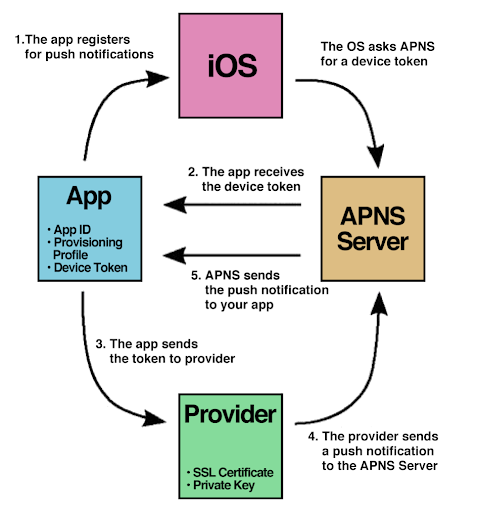
APNs works like the structure above. Here, Firebase acts as the backend server, aka the Provider. (For Android, Firebase’s FCM is used, which makes the process a bit simpler.) So, how do you set up APNs? I’ll explain based on the development environment because that’s where it all starts. 🚀
First, head to Apple’s developer site and enable Push Notification for your app’s Identifier. No need to spell it out, right?
Next, you’ll need to get the Certification for development/testing. Start by generating a certificate request for APNs Certification in your dev laptop’s keychain. Then, use this request on Apple’s developer site to create the APNs service Certificate for your app. Finally, download this Certification and add it to your keychain. Now, you can test APNs on your MacBook. 💻
What’s left? Oh right, backend server setup. You need to register the APNs key on your backend server to send message requests to APNs properly. On Apple’s developer site, there’s a Key menu where you can issue an APNs key for the backend server. Download this key and register it on the backend server. In this case, it should be registered on the Firebase server, which you can do in the Firebase settings. 🛠️
Apart from this, don’t forget to set up reCAPTCHA verification (used when Push Notification isn’t available). Just add the URL for reCAPTCHA to your custom URL scheme. You could fish this URL from GoogleService-Info.plist, but if you skip the setup and run it, the error message will kindly tell you what to paste. Do it in your style. 😉
Leave a Reply